Importing a ROS Node
Workflow
Here's the workflow for importing and using a ROS node in MOV.AI Flow™ –
- Identify the ROS package to install (ROS Noetic).
- Install it in the Spawner container. Typically, there are two development options –
- Compile and install the code from its sources.
- Install code from the repositories (cf.
apt install).
- Add a new node template in MOV.AI Flow™ with the required setup.
Installing ROS Package from Sources
Identifying the ROS Package
Here's an example of how to install a ROS package, which demonstrates how to install the A-LOAM ROS package. The instructions for installing other packages should be similar.
Building ROS Package
Because there are no public repositories that come with the code, the following shows how to build the code from its sources.
- Create a new folder on your host:
~/Documents/MovaiFlow/cache/ros/src. - Clone the source code into that folder:
https://github.com/hexarotor6/A-LOAM.git. - Enter the Spawner container:
docker exec -ti spawner-robot1 bash. - Install all dependencies of the selected package inside the container, as suggested by the author (
sudo apt install libceres-dev libpcl-dev ros-noetic-pcl-conversions). - Finally, build and install your ROS packages (for example, ALOAM) by running the script:
ros1-workspace-build.sh.
# The following are the default settings –
Profile:                     default
Extending:        [explicit] /opt/ros/noetic
Workspace:                   /opt/mov.ai/workspaces/USER_ROS1
-----------------------------------------------------------------------------------------------------
Build Space:        [exists] /opt/mov.ai/user/cache/ros/build
Devel Space:        [exists] /opt/mov.ai/user/cache/ros/devel
Install Space:      [exists] /opt/mov.ai/workspaces/USER_ROS1
Log Space:          [exists] /opt/mov.ai/user/cache/ros/logs
Source Space:       [exists] /opt/mov.ai/user/cache/ros/src
- Assuming that there were no errors, these binaries should now be inside the Spawner container in a new package folder located at:
~/workspaces/USER_ROS1/lib/. In our example, expect a new folder namedaloam_velodyne.
Creating a New Node Template (Analyzing Source Code)
Create a new node template for each ROS node that you need.
By analyzing the source code of every node, you should be able to identify its –
- Parameters
- Inputs (subscribers)
- Putputs (publishers)
In the ALOAM example, three main binaries (ROS nodes) were generated, namely alaserMapping, alaserOdometry, and ascanRegistration.
For example, for ROS1 node alaserOdometry, you can examine its source code and identify Parameters, Subscribed and Published Topics as follows.
Parameters
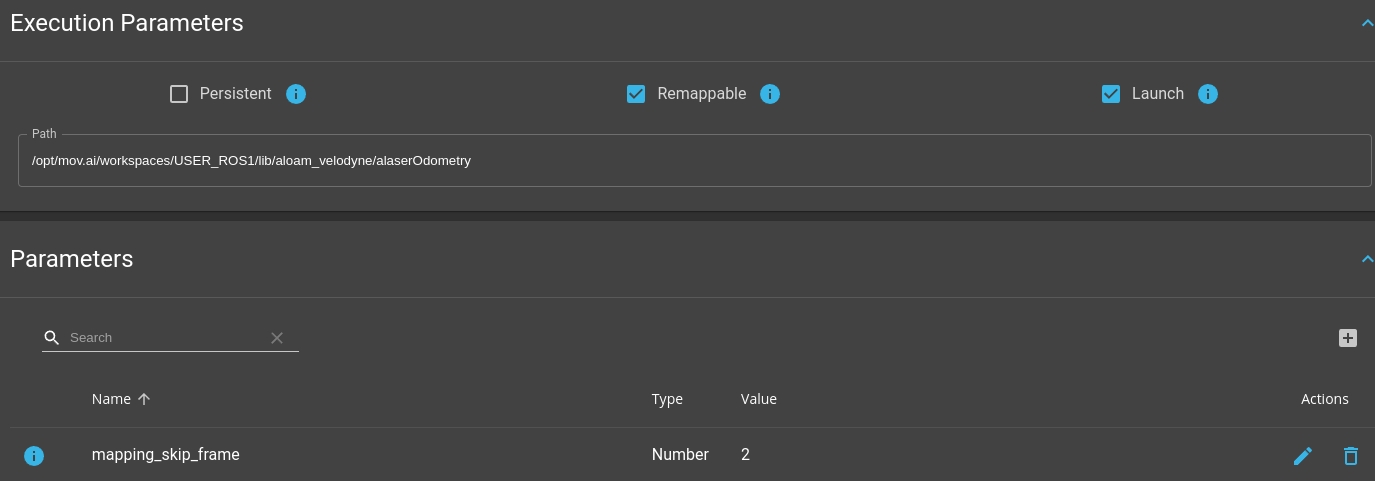
nh.param<int>("mapping_skip_frame", skipFrameNum, 2);
This means that you must create a parameter for the alaserOdometry node, named mapping_skip_frame, with a default value of 2.
Subscribers
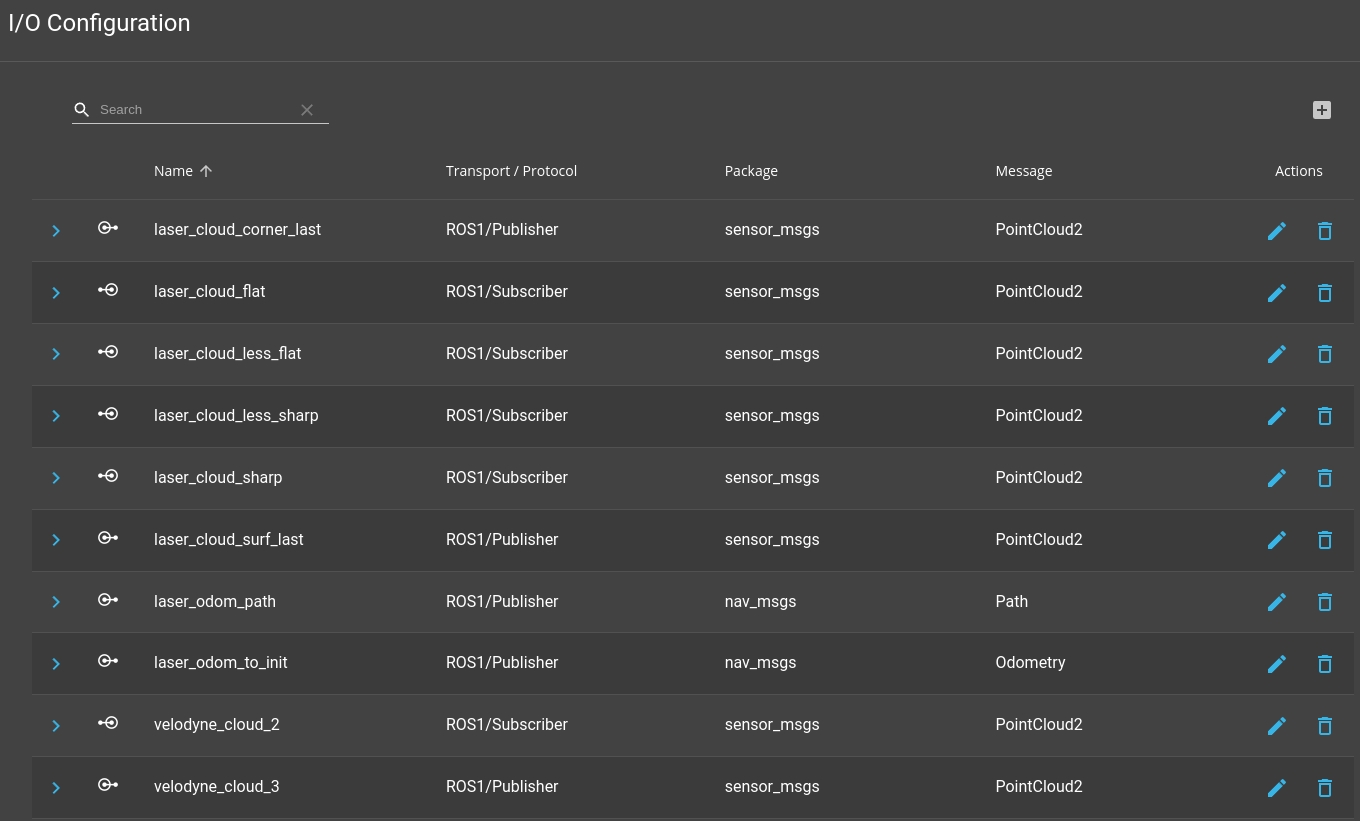
...nh.subscribe<sensor_msgs::PointCloud2>("/laser_cloud_sharp", ...
...nh.subscribe<sensor_msgs::PointCloud2>("/laser_cloud_less_sharp", ...
...nh.subscribe<sensor_msgs::PointCloud2>("/laser_cloud_flat", ...
...nh.subscribe<sensor_msgs::PointCloud2>("/laser_cloud_less_flat", ...
...nh.subscribe<sensor_msgs::PointCloud2>("/velodyne_cloud_2", ...
This means that you must add 5 inputs to the Node Template (ROS1/Subscriber), each of them with its own name and message type.
Publishers
...nh.advertise<sensor_msgs::PointCloud2>("/laser_cloud_corner_last", ...
...nh.advertise<sensor_msgs::PointCloud2>("/laser_cloud_surf_last",...
...nh.advertise<sensor_msgs::PointCloud2>("/velodyne_cloud_3", ...
...nh.advertise<nav_msgs::Odometry>("/laser_odom_to_init", ...
...nh.advertise<nav_msgs::Path>("/laser_odom_path",...
This means that you must add 5 outputs to the Node Template (ROS1/Publisher), each of them with its own name and message type.
Node Template
Create a new Node and add the necessary I/O ports. The final product should appear as follows –
The respective Execution Parameter->Path and Parameters should read as follows –
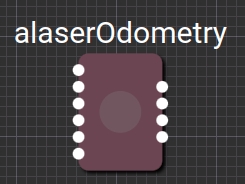
Now, you should be able to add the node alaserOdometry to any Flow by drag and dropping it from the library of nodes. Visually, you should expect a node like the one shown below –
Installing a ROS Package from a Repository
For example, to install the AMCL Localization package –
Search for the package using sudo apt list | grep <name of the package>. Once you have the package name you can install this in the spawner container using sudo apt install
- Enter the Spawner container:
docker exec -ti spawner-robot1 bash. - Search for the package using
sudo apt list | grep <name of the package> - Install AMCL:
sudo apt install ros-noetic-amcl. - Confirm that the
amclbinary is inside the/opt/ros/noetic/lib/amcl/folder.
Creating a New Node Template (Analyzing Its Documentation)
Analyze the documentation of the node. For example, amcl. In this way, you can easily identify the list of subscribers, publishers and parameters that are used. This node also provides services and calls a service.
Parameters
~min_particles (int, default: 100)
~max_particles (int, default: 5000)
...
~laser_likelihood_max_dist (double, default: 2.0 meters)
~laser_model_type (string, default: "likelihood_field")
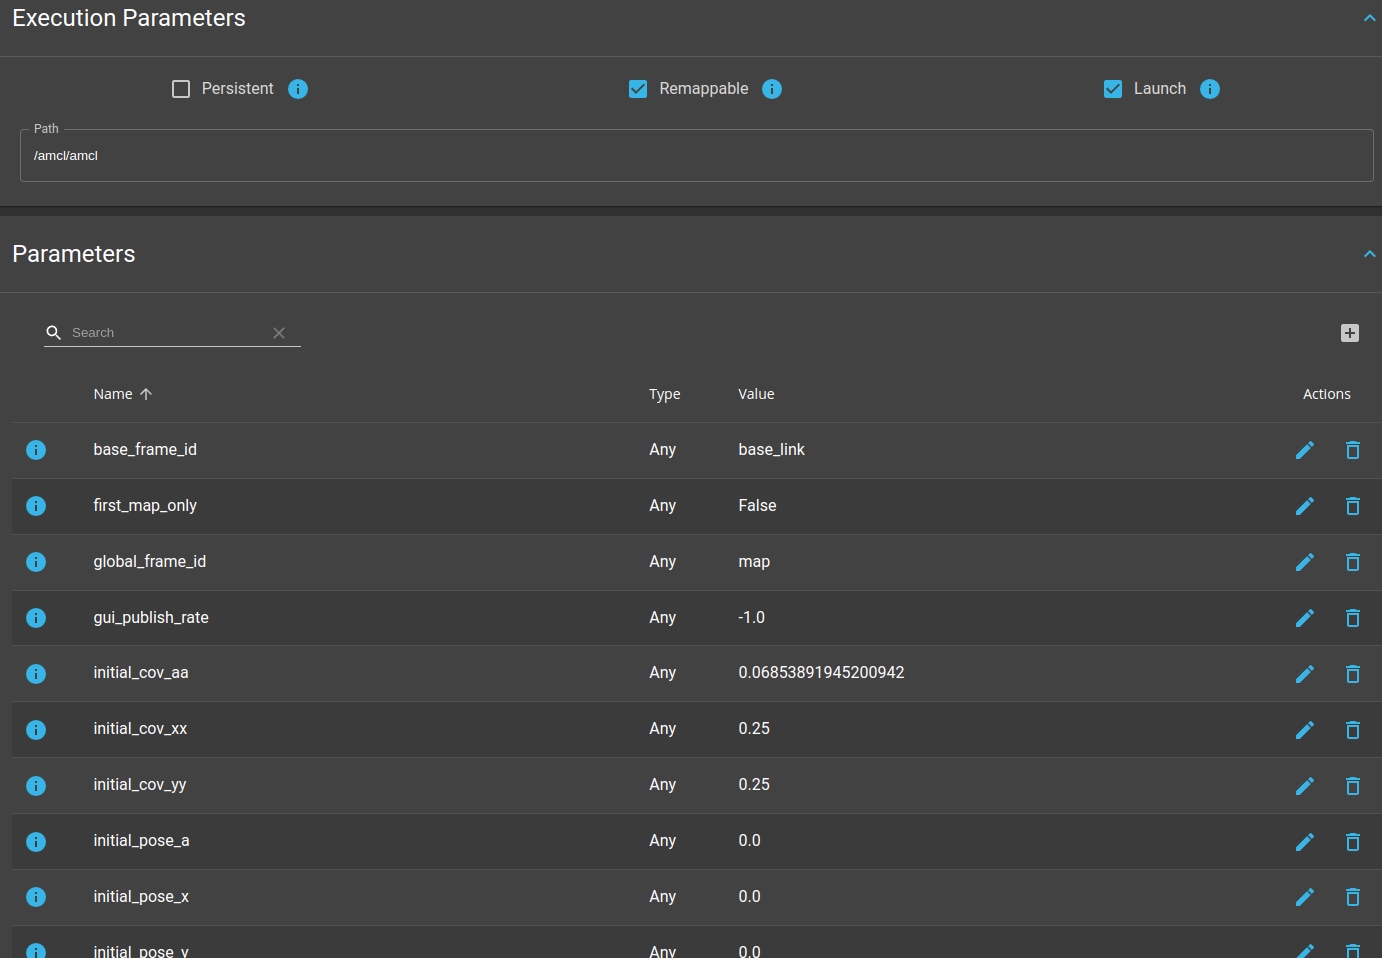
The list contains 42 parameters (it's quite long). Currently, there is no automated way to insert these parameters. Therefore, you must insert each parameter by typing its name in MOV.AI Flow™.
Subscribed Topics
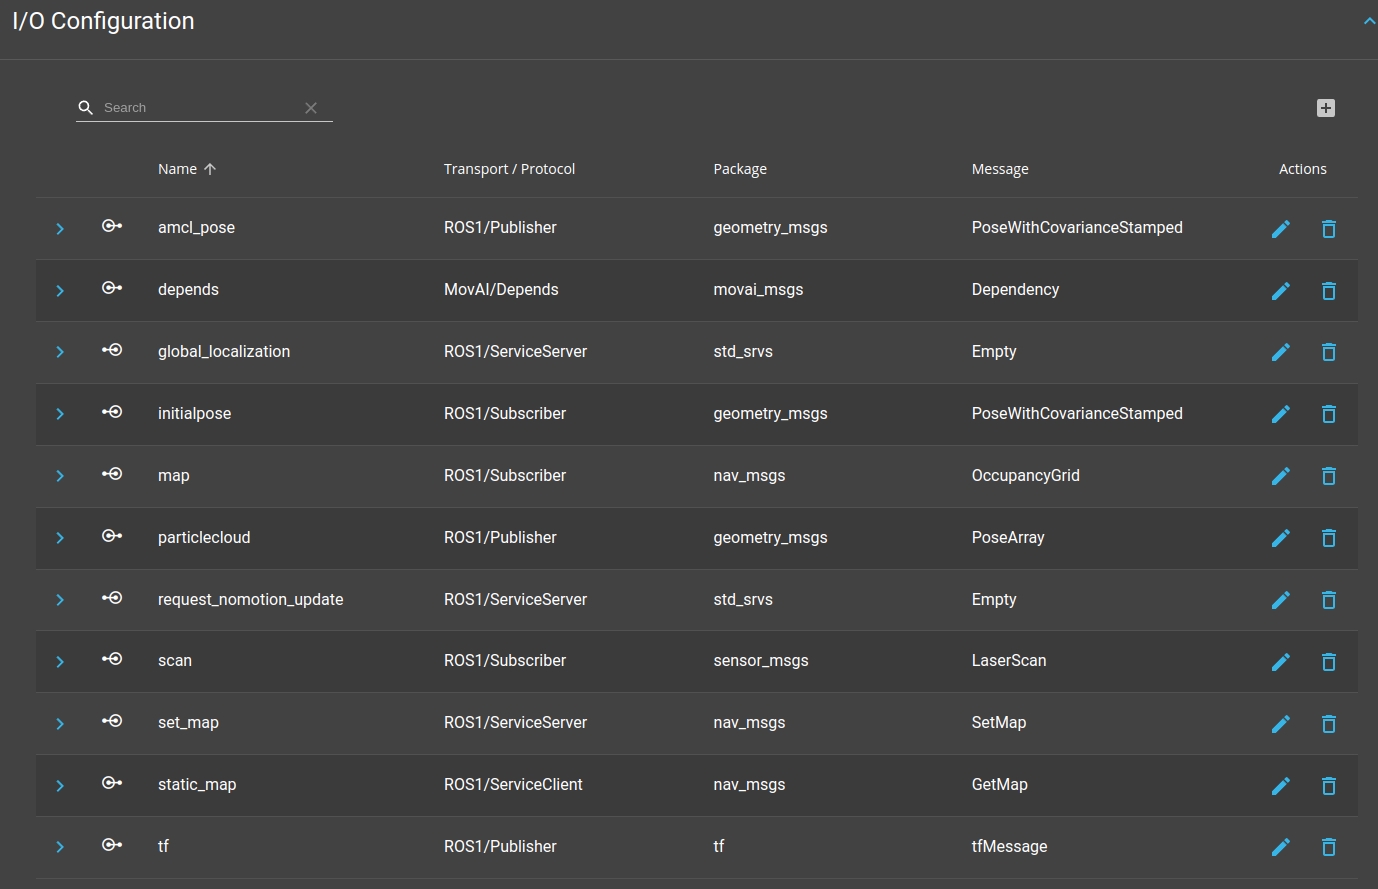
scan (sensor_msgs/LaserScan)
tf (tf/tfMessage)
initialpose (geometry_msgs/PoseWithCovarianceStamped)
map (nav_msgs/OccupancyGrid)
This means that you must add 4 outputs to the Node Template (ROS1/Subscriber), each of them with its own name and message type.
Published Topics
amcl_pose (geometry_msgs/PoseWithCovarianceStamped)
particlecloud (geometry_msgs/PoseArray)
tf (tf/tfMessage)
This means that you must add 3 outputs to the Node Template (ROS1/Publisher), each of them with its own name and message type.
Services Called (client)
static_map (nav_msgs/GetMap)
In your new node template, add a ROS1/ServiceClient type port to represent this interface.
Services Provided (server)
global_localization (std_srvs/Empty)
request_nomotion_update (std_srvs/Empty)
set_map (nav_msgs/SetMap)
In your new node template, add three ROS1/ServiceServer type ports to represent this interface.
Node Template
After performing the above, the I/O configuration of the AMCL node in MOV.AI Flow™ should appear similar to the following –
The list Execution Path information in MOV.AI Flow™ should read as follows, as well as the list of Parameters –
Create a New Node Template (Analyzing the Node)
- Launch the node in the command line.
- Confirm the node's name and that it is actually running by typing:
rosnode list. - Type
rosnode info /<nameofthenode>to see which subscribers and publishers are being used by the node.
Silent Topics
Please note that this method is not recommended, because not all the topics required/used by the node are announced immediately as the node is launched.
In theory, some topics can be silent for an arbitrarily long time.
Updated 10 months ago
